
Tag System
Free feature
Tag System
Labels that categorize URLs within a group, so you can filter, prioritize, and act on them in seconds.
One set of tags for all groups: Tags are not created per group; every tag is available in all of your groups.
What Are Tags?
Tags are custom labels that you can attach to URLs. They provide visual organization and enable powerful filtering capabilities.
Key Features
- Visual identification: Tag badges make URLs easy to identify at a glance
- Filtering: Quickly show only URLs with specific tags
- Multiple tags: Apply multiple tags to a single URL (Pro: unlimited, Free: 2 tags)
- Persistent: Tags are saved with your URLs and included in exports
Common Tag Examples
- By Status: “To Review”, “In Progress”, “Done”, “Approved”
- By Priority: “High Priority”, “Medium”, “Low”, “Urgent”
- By Type: “Blog”, “Product”, “Landing Page”, “404 Error”
- By Action: “Fix”, “Update”, “Delete”, “Keep”
- By Client: “Client A”, “Client B”, “Internal”
Creating Tags
Create custom tags with meaningful names.
1. Open the Groups Tab
Navigate to the “Groups” tab in the bulkU extension.
2. Click “Create Tag”
Click the “Create Tag” button to open the tag creation dialog.
3. Enter Tag Name
Type a descriptive name for your tag (e.g., “Priority”, “Review”, “404”).
Naming tip: Use clear, concise names that describe the purpose or status. Avoid vague names like “Tag1” or “Important”.
4. Create Tag
Click “Create” and your tag is ready to use!
Free version limit: You can create up to 2 tags in the free version, counted across all groups. Upgrade to Pro for unlimited tags.
Tagging URLs
Apply tags to URLs to organize and categorize them.
1. Find the Tag Icon
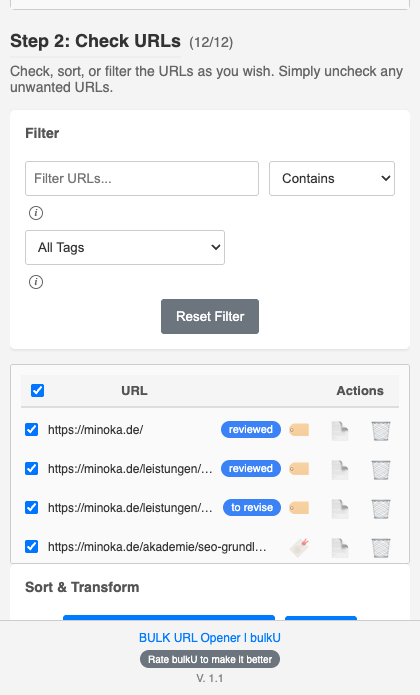
Locate the tag icon (🔖) next to any URL in your list.
2. Click the Tag Icon
Click the icon to open the tag selection menu.
3. Select Tags
Click one or more tags to apply them to the URL. Selected tags are highlighted.
4. Tags Applied
The URL now displays tag badges. Click outside the menu to close it.
Managing Tags
Edit, rename, or delete tags as your needs change.
Editing Tags
- Go to the Groups tab
- Find your tag in the tag list
- Click the edit icon (✏️)
- Change the name
- Click “Rename”
Note: Editing a tag updates it everywhere it is used. All URLs with this tag will show the new name.
Deleting Tags
- Go to the Groups tab
- Find your tag in the tag list
- Click the delete icon (🗑️)
- Confirm with “Delete”
Warning: Deleting a tag removes it from all URLs in all groups. This action cannot be undone!
Removing Tags from URLs
To remove a tag from a specific URL:
- Click the tag icon (🏷️) next to the URL
- Click the tag you want to remove (it will be deselected)
- The tag badge disappears from the URL
Filtering by Tags
Use tags to quickly find and work with specific URLs.
1. Open Tag Filter
Click the tag filter dropdown in the toolbar.
2. Select a Tag
Choose a tag from the list. Only URLs with that tag are displayed.
3. Work with Filtered URLs
Open, export, or perform other actions on the filtered URLs.
Special Filter Options
- All Tags: Shows all URLs (default view)
- Untagged: Shows only URLs without any tags
- Specific Tag: Shows only URLs with that tag
Learn more about filtering in the Filtering & Searching guide.
Tag Workflows
Real-world examples of effective tag usage.
SEO Audit Workflow
- Create tags: “404”, “Redirect”, “Slow”, “Optimized”
- Import URLs from Screaming Frog
- Tag URLs based on issues found
- Filter by “404” to fix broken links
- Filter by “Slow” to optimize performance
- Export “Optimized” URLs for client report
Content Review Workflow
- Create tags: “Keep”, “Update”, “Delete”, “Reviewed”
- Add all content URLs
- Review each URL and tag accordingly
- Filter by “Untagged” to find unreviewed content
- Filter by “Delete” to remove outdated content
- Filter by “Update” to create action items
Research Workflow
- Create tags: “Read”, “To-Read”, “Cited”, “Reference”
- Add research URLs as you find them
- Tag new URLs as “To-Read”
- After reading, change to “Read”
- Tag cited sources as “Cited”
- Filter by “Cited” when writing bibliography
Client Management Workflow
- Create tags: “Approved”, “Pending”, “Revision”, “Completed”
- Add client project URLs
- Tag based on approval status
- Filter by “Pending” for follow-up
- Filter by “Revision” for rework
- Filter by “Completed” for invoicing
WordPress Workflow
- Create tags: “Published”, “Draft”, “Scheduled”, “Needs Images”
- Get all post edit URLs
- Tag based on post status
- Filter by “Needs Images” to add media
- Filter by “Draft” to complete posts
- Bulk open “Scheduled” posts to review
Tag Limits
Understanding the limits helps you plan your tagging strategy.
| Feature | Free Version | Pro Version |
|---|---|---|
| Tags (all groups combined) | 2 tags | Unlimited |
| Tags per URL | Multiple (from available tags) | Multiple (from available tags) |
| Tag Export | ✅ (JSON format) | ✅ (JSON format) |
Need more tags?Upgrade to Pro for unlimited tags.
Best Practices
Get the most out of the tag system:
✅ Do:
- Use clear, descriptive tag names
- Create a consistent tagging system
- Tag URLs as soon as you add them
- Use “Untagged” filter to find URLs needing tags
- Combine tags with filters for powerful workflows
- Document your tagging system for team members
❌ Do not:
- Create too many similar tags (keep it simple)
- Use vague tag names like “Tag1” or “Misc”
- Delete tags without considering impact
- Leave URLs untagged in organized projects
- Change tag meanings mid-project
Troubleshooting
Cannot Create More Tags
Possible causes:
- Reached the 2-tag limit (free version)
Solution:Upgrade to Pro for unlimited tags, or delete an existing tag to create a new one.
Tags Not Showing on URLs
Possible causes:
- Tags were not saved properly
- Browser needs refresh
- Extension needs reload
Solution: Refresh the extension, re-apply tags, or restart your browser.
Lost Tags After Export/Import
Possible causes:
- Exported as CSV (does not include tags)
- Tags do not exist in target group
Solution: Always export as JSON to preserve tags. Create matching tags in the target group before importing.
What is Next?
Now that you understand tags, explore these related features:
Continue with another topic
Jump straight to a related page in the bulkU documentation.
URL Groups
Organize URLs by project, client, or campaign.
Filtering and Searching
Locate URLs by text, tag, or domain.
URL Notes
Attach context, to-dos, and findings to any URL.
bulkU Pro Overview
Every Pro feature at a glance.
Ready to try bulkU?
Install the free Chrome extension and put this into practice.